Secrets to a Flaky Pie Crust Every Time
Creating a flaky and tender pie crust is often considered one of the more delicate skills in baking. The difference between a tough, dense crust and one that shatters into delicate layers comes down to a few key principles. Understanding how ingredients interact and how handling affects the dough can make the process more predictable. For many home bakers, the goal is a crust that is both sturdy enough to hold a filling and light enough to complement it. This article explores the methods and techniques that contribute to that outcome, focusing on temperature control, gluten management, and the role of resting periods.
The foundation of a flaky crust lies in the distribution of fat throughout the flour. When cold butter is cut into the flour, it creates small, flattened pieces that remain solid. During baking, the water in the butter turns to steam, lifting the layers of dough apart. This process is what creates the characteristic flakiness. At the same time, too much handling can develop gluten, which leads to toughness. Balancing these factors requires attention to detail at every stage, from mixing to rolling to baking.
Understanding the Role of Cold Butter
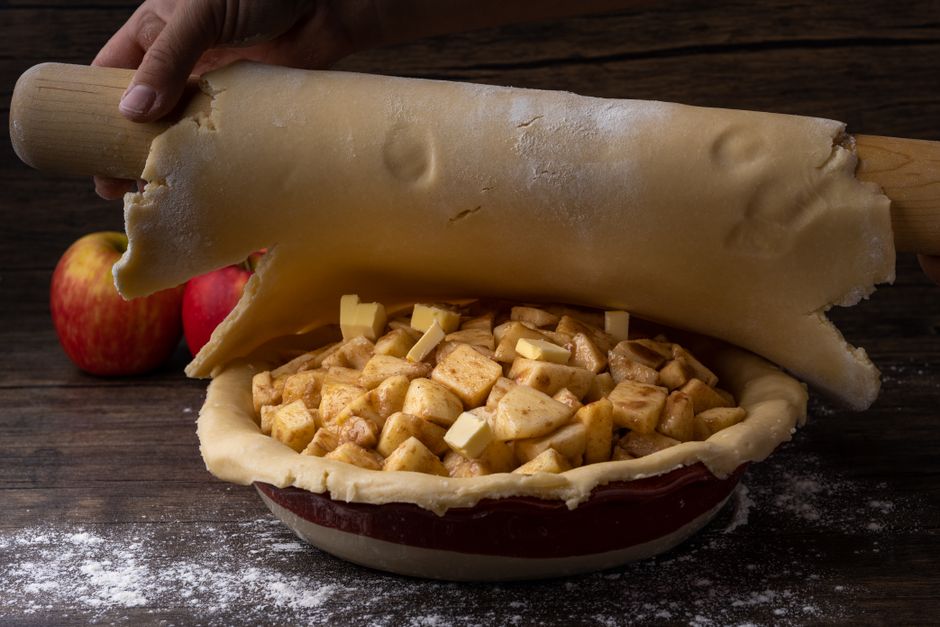
Butter is the primary source of fat in many pie crust recipes, and its temperature plays a critical role. Keeping butter cold ensures that it does not fully incorporate into the flour. Instead, it remains in discrete, flattened pieces. When the dough is rolled, these butter pieces become thin layers. As the pie bakes, the butter melts and releases steam, which creates air pockets between the flour layers. The result is a light, flaky texture that would not be possible if the butter were soft or melted during mixing.
For this reason, it is common practice to chill the butter before cutting it into the flour. Many bakers also chill the flour and equipment, such as the mixing bowl and pastry cutter, to maintain low temperatures. The goal is to keep the butter solid until the dough enters the oven. If the butter softens during mixing or rolling, the fat may absorb into the flour, leading to a denser, more mealy crust. Some recipes call for a combination of butter and shortening, as shortening has a higher melting point and can provide additional flakiness. However, butter alone can produce excellent results when handled properly.
Another consideration is the size of the butter pieces. Typically, the butter is cut into cubes about the size of peas, though some bakers prefer slightly larger chunks for a more pronounced flake. The distribution of these pieces throughout the dough should be uneven, with some areas containing larger bits and others smaller. This variation contributes to a more interesting texture, as different areas of the crust will puff differently during baking.
Minimal Handling to Control Gluten Development
Gluten is a network of proteins that forms when flour comes into contact with water and is agitated. In bread baking, gluten development is encouraged to create a chewy structure. For pie crust, however, gluten development is typically minimized to keep the crust tender. Overworking the dough can result in a tough, elastic crust that shrinks during baking. The key is to add just enough water to bring the dough together and to mix it only until it holds together.
One common technique is to use a pastry blender or two knives to cut the butter into the flour. Once the mixture resembles coarse meal, ice water is added gradually. The dough should be tossed with a fork or your hands just until it begins to clump. It is better to err on the side of dryness than to over-wet the dough. After the dough is formed into a disc and wrapped, it must rest in the refrigerator. This resting period allows the flour to fully hydrate and relaxes any gluten that may have formed during mixing. A minimum of one hour is often recommended, though many bakers prefer overnight for better flavor and texture.
When rolling the dough, the same principle applies. Use gentle, even pressure and avoid pressing too hard. If the dough becomes sticky or elastic, it is a sign that the gluten has developed too much. In that case, it can be helpful to chill the dough again for fifteen to twenty minutes before continuing. Some bakers also use a technique called “folding” rather than traditional rolling, which creates additional layers similar to puff pastry. This method involves rolling the dough into a rectangle, folding it into thirds, and rolling again. While not necessary for a classic pie crust, it can enhance flakiness when done with care.
Rolling Techniques for Even Thickness
Rolling a pie crust evenly is important for both aesthetics and functionality. An uneven crust can lead to parts that are underbaked or overbaked, and thin spots may tear or leak. To achieve uniform thickness, it helps to work on a lightly floured surface and to rotate the dough frequently. A rolling pin with adjustable rings can be useful, as it ensures the dough is rolled to a consistent height. Alternatively, one can use two wooden dowels of the same thickness placed on either side of the dough as guides.
Another tip is to roll from the center outward, applying gentle pressure and turning the dough a quarter turn after each pass. This method helps maintain a round shape and prevents the dough from sticking. If the dough begins to stick, a light dusting of flour can be added, but care should be taken not to incorporate too much extra flour, as that can dry out the crust. Some bakers prefer to roll the dough between two sheets of parchment paper or plastic wrap. This approach eliminates the need for extra flour and makes it easier to transfer the dough to the pie dish.
Once rolled, the dough should be transferred carefully. Gently rolling it onto the rolling pin and unrolling it over the pie dish is a common method. After fitting the dough into the dish, it is important not to stretch it, as stretching can cause the crust to shrink during baking. Instead, lift the edges gently and allow the dough to settle into the corners. Trim the overhang to about half an inch, then fold it under to create a thick edge that can be crimped. The crimped edge not only looks attractive but also helps seal in the filling.
The Importance of Chilling Between Steps
Chilling is not a single step but a repeated action throughout the process. After the dough is mixed and formed into a disc, it is chilled to relax gluten and firm the butter. After rolling and fitting the dough into the pan, it is often beneficial to chill it again before adding the filling. This second chill helps prevent the crust from shrinking and ensures that the butter is cold when it enters the oven. For pies that require a pre-baked crust, such as custard or cream pies, the dough is typically chilled before blind baking.
Chilling times can vary depending on the recipe and the ambient temperature. In a warm kitchen, the dough may soften quickly, so shorter intervals between steps may be necessary. Many bakers chill the pie shell for at least thirty minutes before baking. For best results, the dough should feel firm to the touch. If the dough is too soft, the crust may slump or lose its shape during the initial stages of baking.
Another common practice is to freeze the pie crust for about fifteen minutes before blind baking. The extreme cold helps the fat stay solid longer, which contributes to flakiness. It also reduces the risk of the crust sliding down the sides of the pan. When blind baking, it is standard to line the crust with parchment paper or foil and fill it with pie weights, dried beans, or rice. This prevents the bottom from puffing up while the edges are baking. After a brief period, the weights and liner are removed, and the crust is baked further until golden brown.
Blind Baking for Single Crust Pies
Blind baking, or pre-baking a pie crust without the filling, is necessary for pies that do not require additional baking, such as no-bake custards or fresh fruit tarts. It is also used for pies with a wet filling that would otherwise make the bottom crust soggy. The process involves partially or fully baking the crust before adding the filling. Mastering blind baking can greatly improve the final texture of such pies.
The key to successful blind baking is to keep the crust cold before it goes into the hot oven. After fitting the dough into the pan and chilling it, the crust is docked with a fork to allow steam to escape. Then, a liner is added and filled with weights. The filled crust is baked at a high temperature, typically around 400°F (200°C), for about fifteen to twenty minutes. The weights are then removed, and the crust continues to bake until it is dry and lightly browned. Some bakers brush the bottom of the crust with a thin layer of egg white or melted butter before the final bake to create a moisture barrier.
It is worth noting that the oven temperature and baking time will vary depending on the recipe and the type of pan used. A dark metal pan may absorb more heat, requiring a slightly lower temperature or shorter time. Glass or ceramic pans may need a longer bake. Monitoring the crust visually and using an oven thermometer can help achieve consistent results. The goal is a crust that is fully baked and golden, with no raw or doughy spots.